Driving in the UK for the first time as a right-side-of-the-road driver? You’re not alone—and I think it’s perfectly normal to be a little nervous.
From steering wheels on the “wrong” side to navigating multi-lane roundabouts in the opposite direction, driving in the UK as a foreigner is a challenge many travelers face… and survive! In this survival guide, I’ll share what to expect before you hit the road, what to actually do once you’re behind the wheel, and a few real-life lessons I picked up while road-tripping across the UK. Whether you’re renting a car in London or winding through narrow village lanes, this guide will help you stay safe, drive smart, and maybe even enjoy the ride.
I came away unscathed—and with no regrets—from my lil’ 10-day UK road trip adventure. Something I wasn’t sure was possible.
How to Choose a Rental Car in the UK (Tips for Foreign Drivers)
Renting a car in the UK is one of the best ways to explore beyond the cities—but choosing the right vehicle matters. Here’s everything I learned (and wish I’d known) about picking the best rental car for your UK road trip.
Should You Book Your UK Rental Car in Advance?
Yes—book early to lock in the best prices. I initially reserved a car through Expedia, partly because it offered free cancellation up until pick-up. At the time, I wasn’t 100% committed to left-side driving, so having the option to back out gave me some peace of mind.
Are Rental Cars in London Cheaper?
Surprisingly, yes. At least on this trip, I found that rental cars were cheaper in London than in many other European cities I’ve visited. Maybe fewer people are willing to brave London traffic and left-side roads? Either way—don’t let that scare you off. Enjoy the better rate.
Should You Rent an Electric Car in the UK?
EVs were the cheapest option across nearly every site I checked. I considered it, but since my trip included the Cotswolds and several rural rental apartments, I decided to stick with gas. I just didn’t want to stress about where to recharge in the countryside.
If your trip is mostly city-based or you’re staying somewhere with charging access, it might be a great option. Otherwise, gas may be simpler.
Manual vs. Automatic Cars in the UK
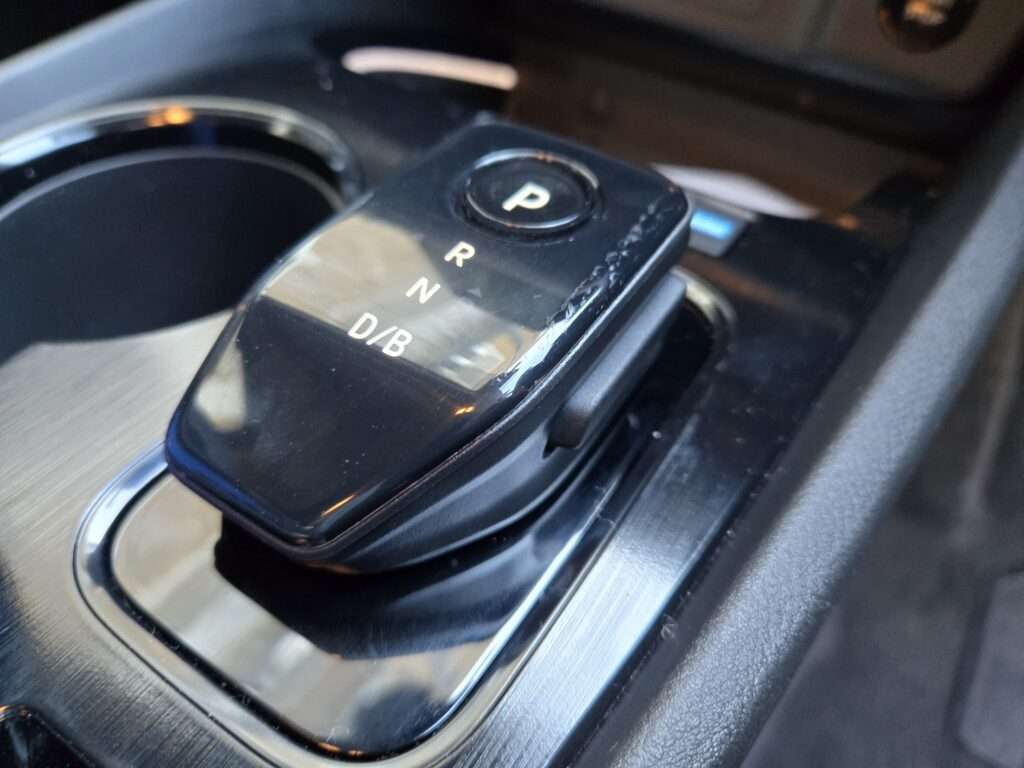
Photo Above: This was the automatic hand lever in my Nissan X-Trail. I fumbled with reverse.
In other parts of Europe, I’ve saved money by renting a manual transmission, even though I never drive one at home. But in the UK? No thanks. Not only do you drive on the left side of the road, but you also shift with your left hand. That was a no for me.
When I picked up my car, the rental agent laughed and said he wouldn’t want to drive a manual around London. Good enough for me.
What Size Car Should You Rent in the UK?
Here’s my rule: pick the smallest car that fits your group and your luggage. Seriously.
While a larger car might sound more comfortable for passengers, it can make driving—and especially parking—way more stressful. The roads are narrow. The lanes are tight. And the curbs are unforgiving.
European cars are small for a reason. Unless you’re already confident driving in the UK, don’t add extra bulk to the equation. And pack light—trunk space is limited.
Tips for Booking the Best Deal
I started with Expedia, but kept checking other sites and eventually scored a better rate through Booking.com a few weeks before departure. It’s worth monitoring prices—they can shift as your dates get closer.
Other booking tips:
Check if the car is allowed to travel outside of England without extra fees
Confirm unlimited mileage (usually included at airport locations). Or calculate the miles you will be driving to make sure the rental is still the best price if you have overage charges.
Picking Up a Rental Car at Heathrow: What to Know
If you’re flying into Heathrow Terminal 5, know that some rental agencies require a short shuttle bus ride to reach their location. I rented from Avis/Budget, which was located in the parking lot of a nearby Holiday Inn—not a bad place to stay if you’re flying in or out and picking up a car.
The Avis/Budget staff were genuinely friendly and helpful—maybe the best experience I’ve had at a rental counter in Europe.
That said, they didn’t provide a printed or emailed rental agreement at pickup, even though they said they would. My travel insurance required a signed contract, and I never received one, despite reaching out. I just hoped the original agreement through Booking.com would be enough if something went wrong.
Tip: If your insurance policy requires paperwork, ask for a copy of your agreement before you drive away. It’s one less thing to worry about.
✅ Quick Tips for Renting a Car in the UK:
- Book early and choose a flexible cancellation option
- EVs are cheaper, but gas may be easier for rural travel
- Stick with an automatic if you’re not confident with left-hand shifting
- Pick the smallest car that fits your needs
- Pack light—trunks are tiny
- Watch for mileage limits and cross-border restrictions
- Confirm you receive a signed rental agreement before leaving the counter
- Check airport shuttle requirements if renting from Heathrow Terminal 5
Buying the Right Car Rental Coverage for Peace of Mind
Let’s talk insurance. Because nothing ruins a scenic countryside drive like wondering, “Am I covered if I hit a curb—or worse?”
When renting a car in the UK, some insurance is always included—but whether that’s enough depends on your personal risk level and what kind of trip you’re taking.
What Kind of Coverage Comes with Your UK Rental?
By law, all UK rental cars include Third Party Cover (TPC). This protects you if you damage someone else’s property or injure another person—including passengers in your car. But it does not cover:
- Damage to the rental car itself
- Theft or attempted theft
- Your own injuries
- Personal belongings in the car
So while you’re legal to drive with this base coverage, it’s not nearly enough to avoid large out-of-pocket costs if something happens.
Many rental companies (like Budget) offer basic damage protection as well, but with a high “excess” (deductible)—often several thousand pounds. If something happens, you’ll be on the hook for that full amount unless you’ve added extra coverage.
➤ Here’s Budget’s sample coverage chart for reference
My Personal Coverage Strategy (Why I Bought Extra)
Normally, I rely on my Chase Aeroplan credit card, which offers primary rental car coverage outside of the U.S.—and for most trips, that’s more than enough.
But this time? I was nervous. Driving on the left, unfamiliar roads, lots of rural driving—I decided to add extra coverage through American Express Premium Car Rental Protection.
How AMEX Premium Rental Coverage Works
If you’re an American Express cardholder, you can enroll once in their premium rental car program, and then you're only charged when you actually use it.
Here’s what I liked:
- Flat fee: $19.95 or $24.95 per rental (not per day!)
- Coverage lasts up to 30–42 days depending on your state
- Higher limits: $75,000–$100,000 in primary damage coverage
- Includes some secondary medical and personal property coverage
Once enrolled, you just need to pay for the rental with your eligible AMEX and sign the rental agreement. I was able to print a confirmation letter showing my coverage and bring it with me—just in case.
➤ More info here from American Express
Note: AMEX Premium does not cover rentals in Ireland or Italy, so double-check your destination.
Other Coverage Options
If AMEX or Chase coverage isn’t available to you, you still have options:
- Buy coverage during checkout on sites like Booking.com or Expedia
- Purchase at the rental counter (usually the most expensive)
- Look into travel insurance that includes rental protection
- Use another credit card with solid international rental coverage (always check fine print—some U.S. cards exclude the UK)
Coverage Details to Watch For
- The “excess” (your deductible): Ask how much you're liable for if the car is damaged. It’s often very high.
- Windshields, tires, and roadside assistance: These aren’t always included, so check before driving off.
- Rental agreement: Make sure you get a signed or emailed agreement—especially if your third-party insurance requires it.
On this trip, I was charged in USD by Booking.com. Even though my AMEX has a foreign transaction fee, I didn’t pay it, because the charge was processed in dollars. A small perk!
My Best Advice?
If you’re nervous, add the extra coverage. If your credit card offers solid protection, make sure to use that card to book, and confirm that your rental and location are covered.
I also recommend booking with a reputable rental company over the cheapest deal from a company you’ve never heard of. Name-brand agencies tend to explain your coverage clearly and I'd like to think they offer better support if anything goes wrong.
Whatever route you go, know that every policy has limits, and it’s worth a few minutes of reading the fine print to make sure you don’t accidentally void your coverage. (Looking at you, off-road driving, unapproved drivers, and letting your partner take the wheel without being listed.)
Inspect the Car for Damage (and Don’t Skip This Step)
One thing I’ve noticed in recent years: rental agencies are getting more hands-off when it comes to vehicle inspection. Increasingly, no one walks around the car with you or marks existing damage on a form. If I ask about it, I’m often brushed off or told to “report anything before leaving the lot.”
Honestly? It doesn’t feel super legit.
I’ve been told—multiple times—to take my own photos or video of the car before driving away. So that’s exactly what I do now: a quick walkaround video with my phone, showing each side of the car, the wheels, the windshield, and any dings or dents. It only takes a minute, and it gives me proof in case anything comes up later.
The Time I Got Burned (And What I Learned)
A few years ago, I rented a car from Avis France that had a large dent in the side. The staff at pickup were friendly, apologized, and assured me it was documented. They even emailed me a damage report with over 50 items.
But when I returned the car to a different location, I was told there was no record of the damage, and I was charged for it. Despite multiple emails, copies of the damage report, and calls, Avis never resolved it.
Thankfully, Chase reversed the charge as a chargeback. Their coverage would have been responsible had it been legit—but it was clearly not my damage.
My Advice?
Be your own advocate. Don’t assume the rental company is tracking things accurately or has your back after you drive off. These companies are often busy and friendly at pickup—but once you're gone, their helpfulness can drop off quickly.
- Take photos and video before leaving the lot
- Ask for a damage report in writing, if one exists
- Save your photos until the trip is fully over
- Report anything questionable immediately—before driving away
They have your credit card number and seem perfectly willing to use it. Protect yourself first.
Adjusting to Driving on the Left
This is the part everyone really wants to know: What is it actually like to drive on the left side of the road? Let’s just say, even getting into the car felt like a comedy sketch.
Wait, Who’s Driving?
It was hard to even get in the car the first time. The passenger climbs into what we think is the driver’s seat, and vice versa. Don’t be surprised if your whole group instinctively goes to the wrong side before realizing they need to switch—it’s just muscle memory at work.
Before You Drive, Take a Moment Inside
Once you’re in, take a breath and get familiar with your surroundings. European cars often have different placements for things, and trust me—you don’t want to be figuring out windshield wipers or high beams while trying to stay left.
The spatial orientation feels off at first. There’s suddenly a wide expanse of windshield on your left… and not on your right, where you’re used to it. It’s subtle but weird. For me, the rearview mirror was the hardest adjustment. I couldn’t find a comfortable angle and kept repositioning it, but it just didn’t feel natural to look that direction. That muscle memory never really kicked in.
Other Car Controls? Manageable.
The steering wheel and pedals were exactly as expected. The main difference was that the center controls were to my left. Maybe this is where left-handed drivers finally get their win?
Some rental cars had stickers on the windshield reminding the driver to “Keep Left”, which were surprisingly helpful—until I got flustered and temporarily forgot which side left even was. (It happens.)
Flow Over Force
The real breakthrough came when I stopped trying to think about driving on the left, and started just observing the flow of traffic. Instead of reasoning my way through which side to be on, I followed the direction of the cars around me—and it worked. I stayed calm, fell into line, and didn’t overthink it. Zero incidents. That’s a win.
I also had Gary in the passenger seat helping me navigate, and he was amazing—especially when I needed reminders on lane positioning. It was his first time navigating left-side driving too, and he crushed it.
Learning to Trust the Center Line
One of the hardest things for me spatially was lane positioning. In the U.S., I’m used to having a shoulder on my right, and I tend to hug that side as a reference point. But in the UK, the shoulder is now on the left (if there even is one, which generally there wasn't)—and the center line is your new guide.
At first, I kept drifting too far to the left to avoid oncoming traffic. This meant I was often too close to the curb or hedgerows on the passenger side. After a few days—and a few gentle passenger reminders—I realized I needed to make peace with the center line.
It helped to start using my side mirrors to gauge the space between both sides of the car and the road markings. I was able to see how much room I really had and learned to adjust my position based on those visual cues. Turns out, I often had plenty of room on the right and could safely shift slightly closer to the center line without drifting into oncoming traffic.
Finding that middle-ground comfort zone took a few days, but it helped me feel less tense and more confident. I started to understand what a “safe close” to the middle line felt like, while still avoiding brushes with the curb, bushes, and parked cars on the left.
Biggest Challenge? Turning Right at Intersections
The scariest moments for me came when approaching intersections and needing to turn right. You have to cross oncoming traffic, which—because of how lanes are flipped—comes straight at you from the right. At 60 mph. With no shoulder.
I kept creeping up too far trying to get a better view, and realized I was unintentionally pulling into the oncoming lane. Be careful when turning right: stop early, look carefully, and give yourself more time than you think you need. That moment of hesitation could save you from a big mistake.
Even Parking Lots Can Be Confusing
Parking lots were their own kind of weird. But to the UK’s credit, I noticed that almost every lot had arrows painted directly on the road to show you which way to go. That helped a lot. The system is designed to support drivers like us—you just have to slow down and follow the signs.
You Don’t Have to Be Perfect—Just Be Present
Driving in the UK isn’t about mastering a new skill overnight. It’s about being mindful. You can’t go into autopilot mode like at home—you need to stay alert, be intentional, and let go of trying to be the leader on the road. Follow the flow. Follow the signs. Let the road lead you.
And if someone in the rental car lot pulls in the wrong lane? Don’t panic. Maybe they’re returning the car after five minutes, fully defeated. Maybe they just forgot. The point is: you’re trying, you’re adjusting, and you’ll be fine. If you are like me, you will realize this quickly once you just start driving. If you are reading this nervous, which I was so nervous about this myself, know that it really isn't as bad as your mind is likely making it out to be. Our bodies and minds adapt all the time, that's what humans do, and that's what you'll do when you get in the car.
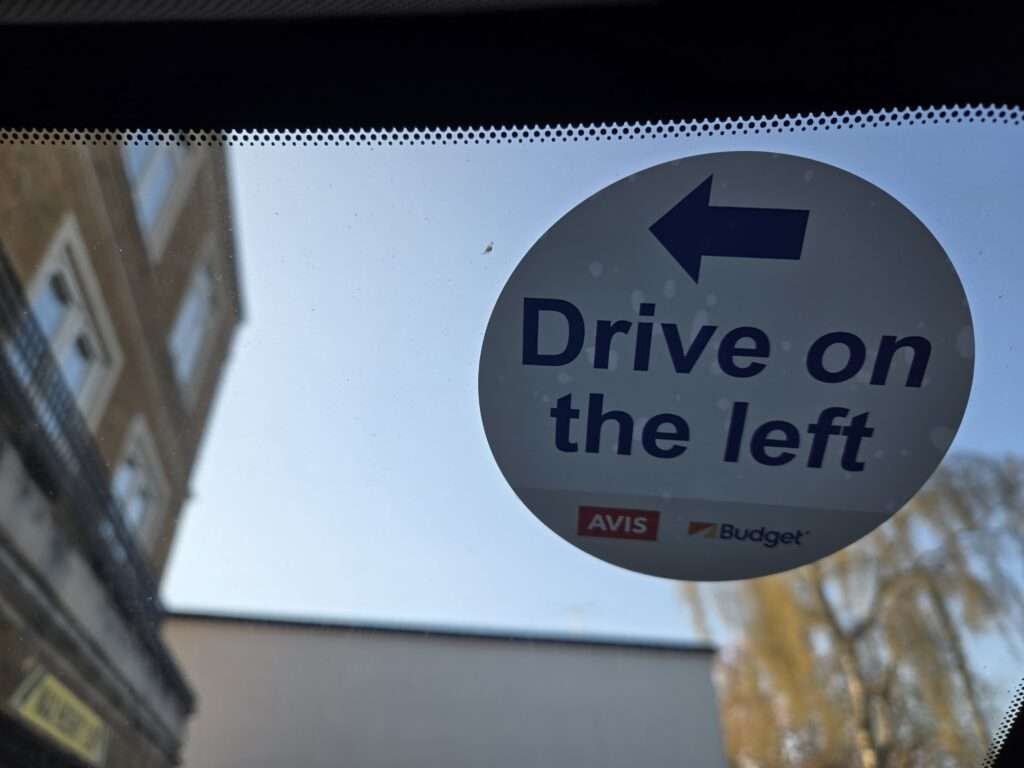
Photo above: The helpful sticker that reminded me to “stay left,” just in case I forgot to chant this to myself the whole time I was driving.

Photo above: My first real look at what a car looks like when the steering wheel is on the right.
UK Road Signs and Speed Limits: What You Should Know
Just when you’ve gotten used to driving on the left side, using the center line as your friend, and not accidentally turning on the windshield wipers instead of the blinkers—along come the UK road signs and speed limits.
Some signs make total sense. Others… feel like inside jokes you weren’t let in on. And as a bonus twist, the speed limit? It’s in miles per hour. Yes, really.
Wait—Miles Per Hour?
Of all the things that flipped when driving in the UK—sitting on the right side of the car, shifting (if you're brave) with your left hand, driving on the left side of the road—you’d think they’d also use kilometers like the rest of Europe, right?
But nope. Just to keep you on your toes, the UK uses miles per hour (mph). Honestly, it felt like a plot twist. Everything else is opposite, but the speed units? Somehow still miles.
I wasn’t expecting that, and it threw me. Luckily, my rental car only had mph on the dashboard, so at least I wasn’t second-guessing what gauge I was supposed to follow. If you're planning to take your car into another country that uses kilometers, that might be something to watch for.
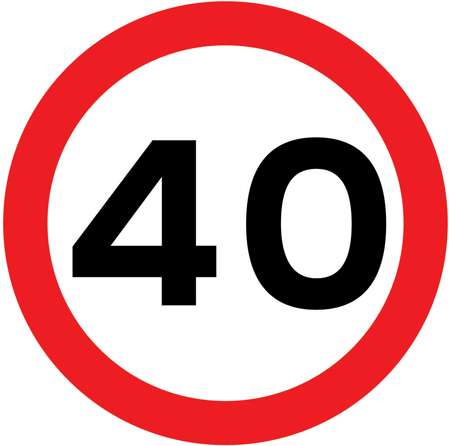
Speed Limits: A Quick Reference
- Motorways (highways): 70 mph
- Dual carriageways: 70 mph
- Single carriageways: 60 mph
- Urban/residential areas: 30 mph
- City centers or near schools: sometimes 20 mph
Speed limits aren’t always posted frequently—especially on rural roads—so it’s a good idea to use a GPS that shows the current limit in real time.
How to Read UK Road Signs
This simple breakdown helped me make sense of the chaos:
- Circles give orders: Blue = what you must do, White with red border = what you must not do
- Triangles warn: Typically used for hazards or alerts ahead
- Rectangles inform: Used for directions and general information
There are some exceptions (like the “STOP” and “Give Way” signs), but this general rule held up across most situations.
For example, if you see a white circle with a red ring and a car symbol, it means vehicles are not allowed beyond that point—not just a suggestion!
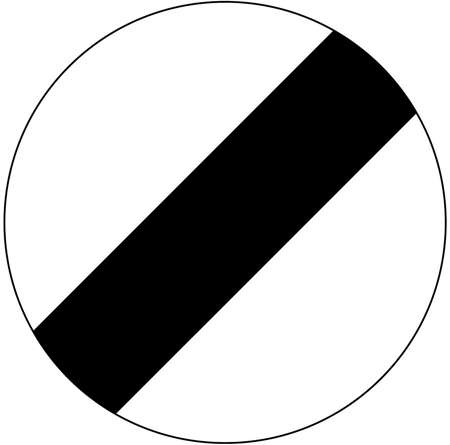
The National Speed Limit Sign
This one threw me at first. A plain white circle with a black diagonal stripe? That’s the “national speed limit applies” sign. What is the national limit? Well, that depends on the type of road—either 60 or 70 mph.
Speed Cameras & Average Speed Zones
The UK is known for its speed cameras, and they’re not a bluff. The boxes I saw were bright yellow, usually with a warning sign a few hundred meters before. So if you see the sign—slow down, because there’s still time.

There are two types:
- Speed camera zones: If you’re over the limit when you pass, you could get a ticket.
- Average speed check zones: You’re timed between two cameras. Even if you weren’t speeding at the start or end, you can still get ticketed if your average was too high.
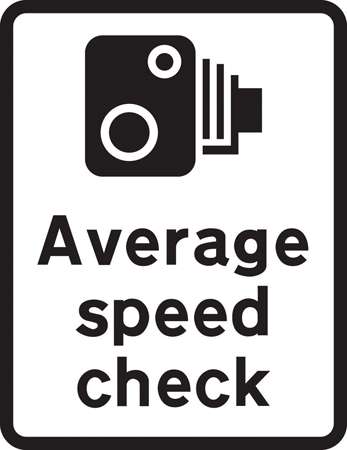
On our trip, our car would beep when we were even 1 mph over the limit. At first it was annoying, but honestly? I grew to love it. With so many speed changes and random slow zones, it kept us in check. (Gary tried to find a way to turn it off. I insisted we keep it.)
Quick Tips: UK Road Signs & Speed Limits
- Speed limits are in miles per hour (mph), not km/h
- National speed limit = 60 or 70 mph, depending on the road
- Circles give orders, triangles warn, rectangles inform
- Blue circles = required action, red-bordered circles = restriction
- Yellow speed cameras are real—watch for the warning signs
- Average speed zones measure between two points—stay consistent
- Use GPS apps with speed display features to help stay legal
If you want to dive deeper into the world of UK road signs—or you're just curious what all those triangles and circles really mean—the UK government has a surprisingly helpful little booklet: Know Your Traffic Signs. It’s free, visual, and much more readable than you’d expect for a government document.
Navigating British Roundabouts
Roundabouts: one of the most iconic (and mildly terrifying) features of driving in the UK. If you're a right-side driver visiting Britain, chances are your first roundabout encounter will happen just minutes after leaving the airport.
They look intimidating. They feel fast. And yes, they go the “wrong” direction—clockwise instead of counterclockwise.
First Rule: Stay Left and Look Right
Roundabouts in the UK are clockwise, which means you enter by turning left and yield to traffic coming from your right. It’s the opposite of what many Americans are used to—but once you get used to it, it works beautifully.
As you approach a roundabout, you’ll usually see a triangle warning sign and a set of directional arrows painted on the road. Pay attention to those road markings—they’ll guide you into the correct lane for your intended exit.
Not All Roundabouts Are Created Equal
There are two general categories of roundabouts, in my experience: the “harmless little guys” and the “slightly terrifying multi-lane chaos circles.”
The smaller roundabouts sometimes function more like four-way stops. You might barely slow to a roll, swing through it to make a right-hand turn, and move on. Honestly, these made turning right much easier—you never had to cross directly into oncoming traffic. And while technically you’re supposed to drive around the circle, you’ll notice plenty of locals just cutting right through. These little ones seem to exist just to slow everyone down and make people pay attention.
The bigger roundabouts, though? They can be intense. Multi-lane, high-speed, heavily trafficked—these are where your adrenaline spikes. But thankfully, the more complex the roundabout, the more directional help you’ll see on the street itself. Arrows, lane markings, and painted road names like “A30” are your best friends. In fact, if you are seeing lots of directions written on the lanes - like highway numbers and the direction of the highway, they are there because they are necessary. So pay attention and get in the marked lane, for the place you want to go. If you follow these directions, you'll probably navigate the roundabout like a pro. And if you ignore them, there's a good chance you'll come out of the roundabout on the wrong highway or headed on the right highway, but in the wrong direction (which isn't reason to panic, you're GPS will reroute you and you can try again).
There Are Also Just... Normal Roundabouts
While the tiny four-way-stop-style roundabouts and the dizzying five-lane monsters are the ones you’ll remember, the truth is: most roundabouts in the UK are totally normal. One or two lanes, clear signage, manageable traffic. You’ll pass through dozens without even thinking about it.
They’re just part of the rhythm of driving here—and honestly? Once you get used to them, they’re kind of brilliant. Miss a turn? No problem. Roundabouts make it super easy to turn yourself around without having to attempt a stressful U-turn on a narrow country road. Just keep looping until you find your exit again.
By the end of the trip, roundabouts seemed normal and nothing to sweat.
Let the Paint Be Your Guide
I want to really drive home this point. When entering a large roundabout, try to get into the lane marked with the road number and town direction you want. Don’t go by left/right or “second exit” if it’s hectic—go by destination.
If you're helping someone navigate, here's a tip: don’t say “turn right” at the roundabout. I mean, technically yes, but if the driver hears “right,” their brain might try to literally turn right into the roundabout (ask me how I know). Just say: “You’re exiting onto the A30,” or “Take the exit for Oxford.” Or, take the third exit and help them count.
I nearly turned right into the roundabout once—fortunately, arrows painted on the road were clearly pointing left, and that snapped me back. Had there been other cars in the roundabout at that moment, I wouldn't have made that mistake. Just follow the flow, and you’ll be fine.
How to Use a Roundabout (Step-by-Step)
- Slow down as you approach, and read the signs and road markings.
- (Always) Yield to the right—traffic already in the circle has the right of way.
- Enter when clear, keeping to your assigned lane.
- Signal left just before your exit.
- Exit smoothly—and don’t stop inside the roundabout unless absolutely necessary. Really, don't stop! We have a couple of roundabouts in my town in the States, and people have actually stopped in the roundabout for no decipherable reason and I almost ran into them. These are flowing lanes so keep flowing.
Roundabout Rule of Thumb: Don’t Panic, Just Loop
The beauty of a roundabout is that it’s a circle. If you miss your exit, just keep going around again. Nobody cares. No one’s judging. No three-point turn required.
And honestly? If you don’t cause an accident, nobody will even notice if you looked confused. Everyone else is trying to get through, too.
Quick Tips: Driving in UK Roundabouts
- Approach slowly and read all signs and lane markings early
- Yield to the right, and don’t stop once you’re in
- Use your left signal as you prepare to exit
- Don’t use left/right cues to navigate—use road names or route numbers
- If you miss your exit, just go around again
- Smaller roundabouts may be treated more like 4-way stops
- Bigger roundabouts usually offer more painted guidance—trust the paint
Navigating Narrow Country Roads
Driving on narrow country roads in the UK was not nearly as stressful as I imagined it might be. I’d built it up in my head, but once I was out there, I found that the roads weren’t really any narrower than what I’ve experienced in other parts of Europe.
That said—yes, they’re definitely narrower than what most U.S. drivers are used to.
What’s Different from the U.S.
Here’s the main difference: in the U.S., most roads are wide enough that even a standard two-lane road has a bit of a buffer. It’s often possible to imagine a third lane running down the center. There’s space to pull over, swerve, or let someone pass. There’s usually a shoulder—or signage to let you know if the shoulder is missing.
In the UK countryside? Not so much.
Many rural roads don’t have a shoulder at all. Sometimes there’s a stone wall, a hedge, or just a sharp edge into a ditch. The lanes themselves are often just wide enough for one car, with no room for error. And yet… the speed limit might still be posted at 60 mph.
It’s All About Cooperation
One of the most noticeable things on these roads is how much drivers have to work together. There’s no official passing lane or median to buffer between you and oncoming traffic. So when two cars approach, or a tourist bus barrels through, people slow down, pull into available spaces, or work out little maneuvers to let each other by.
You might find yourself backing up a few feet to let someone squeeze past, or waiting in a lay-by while a delivery van comes through. It’s normal. Everyone just sort of… figures it out. (And somehow it works.)
Tips That Helped Me Stay Calm
What’s worked for me is pretty simple: I let others lead. If someone else is already navigating the road ahead of me, I follow their pace. If I meet a car and don’t know how we’re going to pass, I wait and let the other driver take the lead. Locals know these roads well—they’ll usually guide the moment.
If I’m alone on the road, I assume someone could be around the next bend. I try to keep my speed manageable, and I keep my eyes on the road. These roads are not the time to glance at your phone or zone out looking at sheep.
Also, country roads are shared spaces. You might see pedestrians, cyclists, or even a horse and rider. And with no center line and no shoulder, you’ll all be using the same space.
The Bottom Line
Yes, these roads are narrow. Yes, the speed limits can feel totally unhinged. But if you stay alert, drive defensively, and go with the flow of the locals, you’ll do just fine.
(And in case you need visual proof—check the photo below. This is what a typical country road looks like: no shoulder, no line down the middle, and often no one else around for miles.)
And yes, it's a beautiful place worth the effort to drive and see.
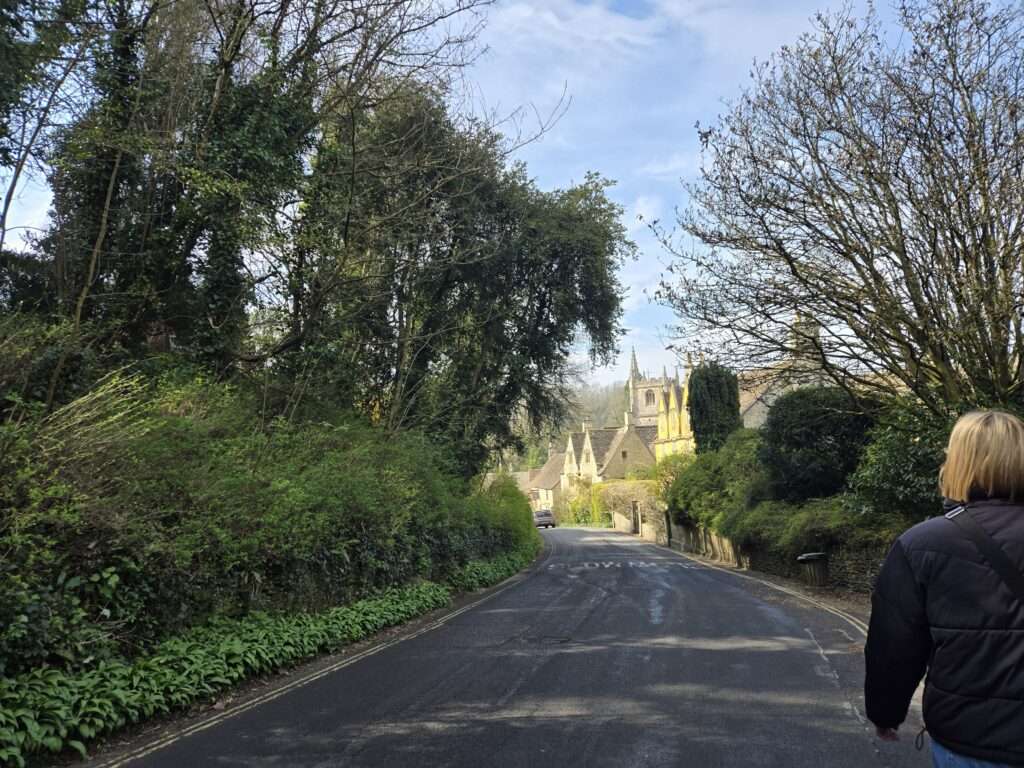
Photo above: A beautiful country lane (look closely in the distance and you will see how instructions are painted on the road – in this case the instruction says “slow”).
Speaking of what you might come upon as you navigate these roads… I was driving along a road with a 60 MPH speed limit when I came around a bend and found a line of stopped motorcyclists. Up ahead, a rider was struggling to control some uncooperative horses. And everyone—on both sides of the road—was just stopped, watching the show.
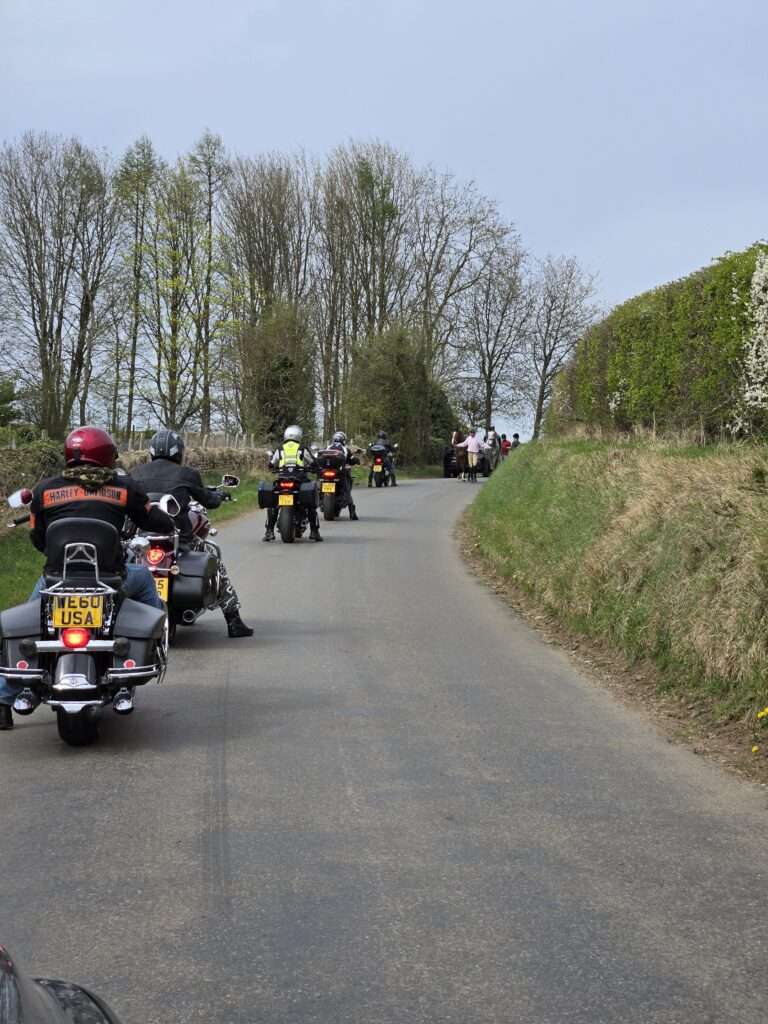
Photo above: Just your typical traffic jam in the UK countryside.
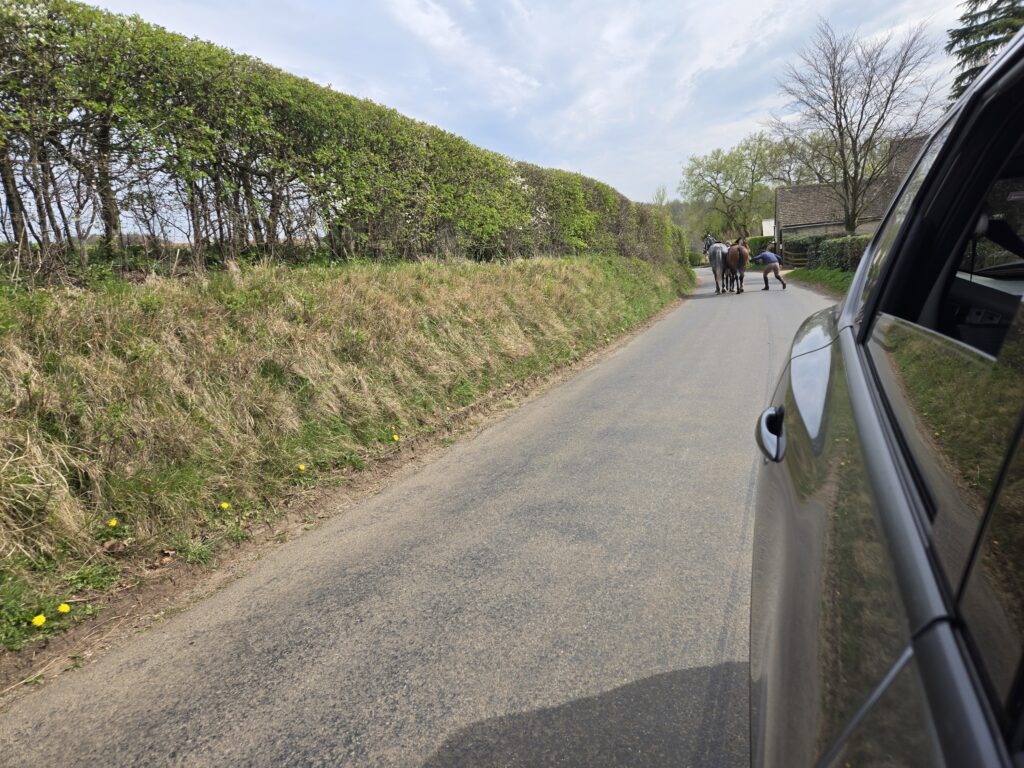
Photo above: The show didn’t end here—it moved past our parked car and continued straight down the middle of the road, rider apologizing as they went, horses still doing their own thing.
Parking in the UK: What to Know Before You Go
Parking in the UK isn’t impossible—but it does take some planning. My best advice? Don’t leave it up to chance. Before you arrive in a town or city, try to identify where you’ll park (the Brits call them Car Parks). I usually use Google Maps to scope out lots in advance, or I ask the place I’m staying if they have recommendations. It’s also smart to have a backup lot in mind, especially in touristy areas.
For example, when we visited Windsor, my first-choice lot was full—so I quickly rerouted to our second-choice lot nearby. It saved us from having to circle aimlessly and hope something opened up.
💡 Time of day matters: lots can be jam-packed around 1 p.m., but by 5 or 6 p.m., they’re often nearly empty. Many tourist-heavy towns get quieter as daytrippers clear out, which makes evenings a great time to arrive or explore. To me, it was a shocking contrast. You may hear this often before you travel to these places; but I had to see it to really understand this.
Expect to pay for parking almost everywhere. In fact, the total we spent on parking during our trip was close to the cost of the rental car itself. It should be a budget line item—it adds up.
Interestingly, we found that public parking lots were often more convenient and cheaper than paying for a parking spot through a hotel or rental property. But if you are planning to park at your accommodation—especially in old town areas—there may be some hoops to jump through. You might need to provide your license plate number in advance so the property can register you for a local permit, or they may need to hand off a key fob that lowers a barrier to access your spot. These can be tight and tricky to navigate—sometimes even harder than a crowded lot.
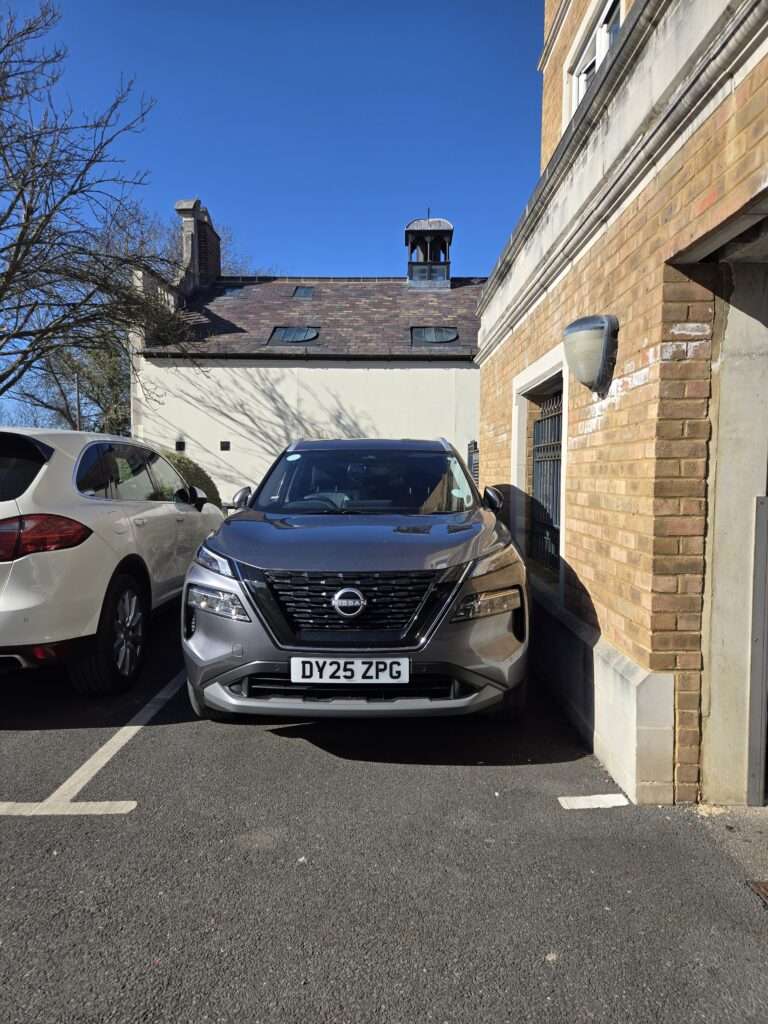
Photo above: One of the only spots left in the lot when we arrived in Windsor/Eton. It was a squeeze, but it worked and we left the car here for 3 nights without issue. This lot was really close to our apartment.
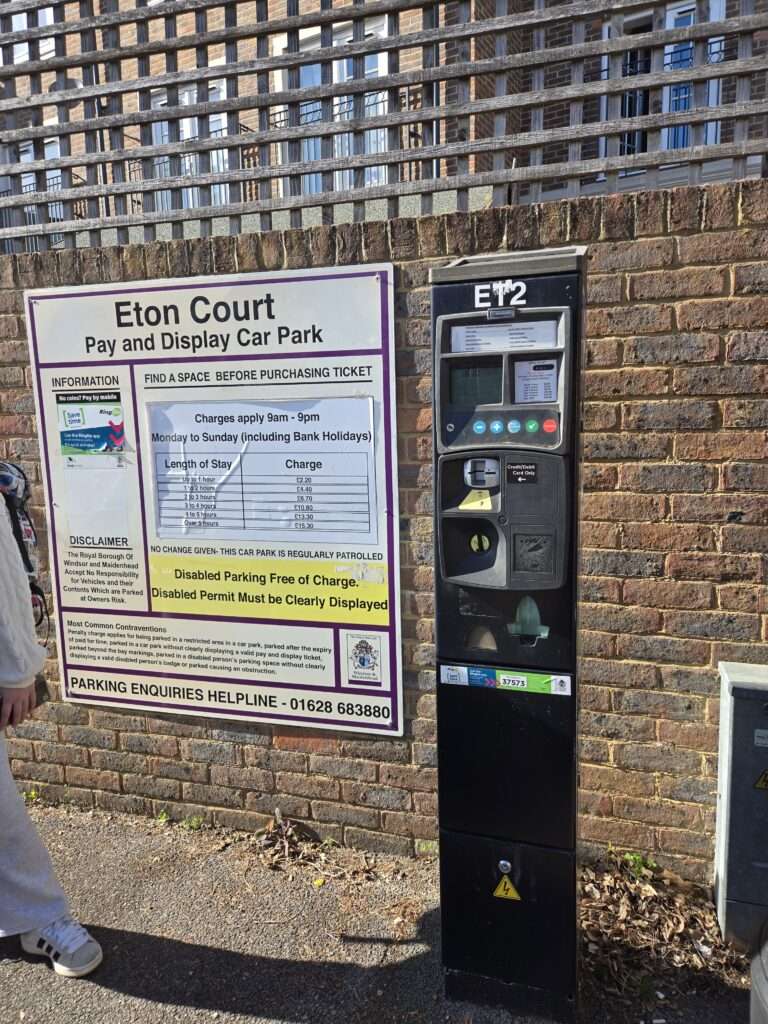
Photo above: This is where we paid for our parking in Windsor/Eton. I returned each morning to pay for another day, before 9am.
Parking Logistics: Small Cars, Light Luggage, Tight Spaces
A few things to help make parking less stressful:
Size matters. The smaller your car, the easier your life will be. This goes for driving and for parking.
Pack light. Some parking spots may be a short walk (or a few flights of stairs) away from your lodging. If you’re hauling giant bags over cobblestones or through tight stairwells without a lift, you’ll wish you packed less. My family’s rule: bring only what you can carry—and carry it yourself. I have an article on how we pack for these trips here.
Fold your side mirrors in once parked—it’s common practice and gives you (and others) a little extra clearance.
Let passengers out before you pull into a tight space—it’s easier than trying to squeeze everyone out once you’re wedged in.
Back in, if others are doing it. If most people are reversing into spots, there’s probably a reason—like limited space for turning around. Backing in may even be easier than pulling in forward.
Use your tech. If your car has parking sensors or a rear camera, use it! It can make a tight spot far less stressful.
You’ll be surprised what you can fit into—and how many people do it every day.
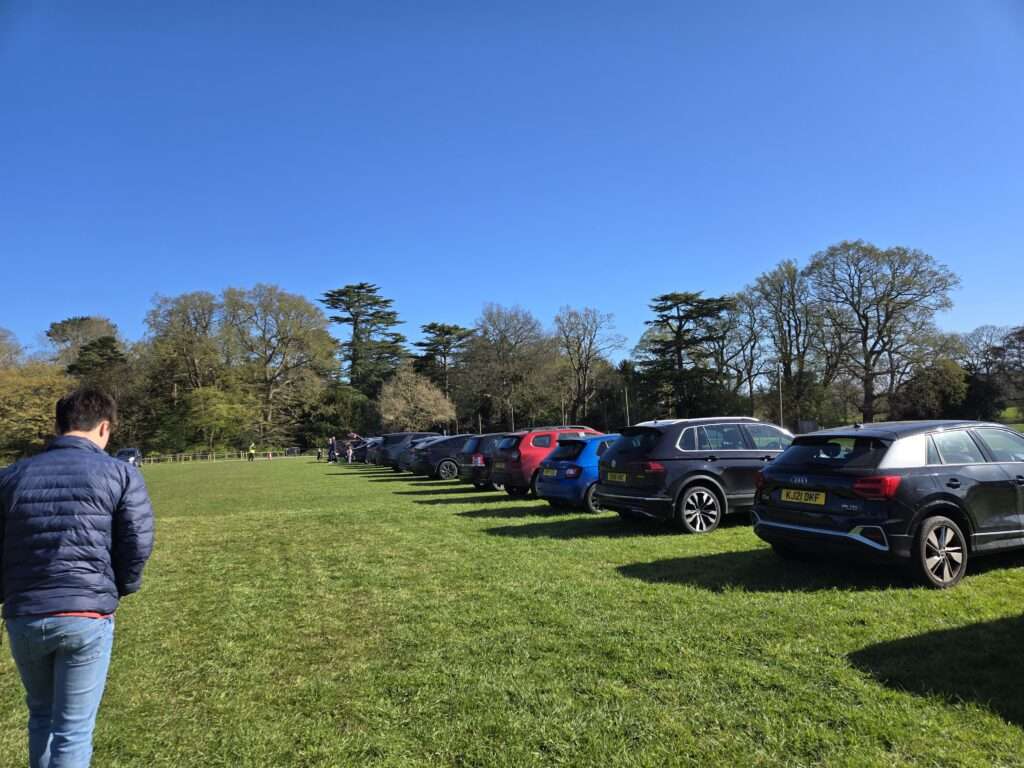
Photo above: This was the Car park at Warwick Castle. A nice green lot. You can pay when you exit, with a quick tap. I wasn’t sure what to do, so I asked the lot attendant.
Paying for Parking (and Why Park & Rides Are Your Friend)
Nearly every parking lot we used had a pay system, and yes—you should expect to pay everywhere. Whether it’s a small town, a National Trust site, or street parking in a city, budget for it.
Some tips:
Payment is usually by card—contactless or chip. Super convenient.
You’ll often need your license plate number, even if you get a paper ticket.
Many lots require you to choose how long you’ll stay and pay in advance. Have a rough idea of your timing.
Document where you parked. Save the location in Google Maps or take a photo of the lot sign. It’s easy to forget, especially if you’re moving quickly.
💡 In places like Bath, your parking rate may even depend on your car’s eco score. You’ll input your license plate, and the system calculates your fee based on the vehicle model. Clever… but unexpected if you’re new to it.
Payment Methods and Tourist Challenges
You’ll often see signs for payment by app or by text, which are great options for locals but a bit trickier for visitors. Most apps require setup in advance (and sometimes a local phone number). Paying by text usually means you need to register your credit card over the phone first, which might not be possible as a tourist.
When in doubt, look for:
A working card payment machine
Backup lots in case machines are down (we had this happen twice—no one could pay, and it worked out, but it was unclear)
Special Notes on Permits, Lots & Street Parking
If you’re parking at a National Trust or English Heritage site, your membership may include parking. That can make a pass more cost-effective, especially if you visit multiple properties.
Street parking is common, but often more restrictive than lots. Watch carefully for signs—many areas require permits, have minimum time blocks, or restrict how often you can return.
In some places—especially National Trust or English Heritage properties like Lacock or Runnymede—the main parking lot may not open until the site opens. If you’re hoping to arrive early (say, for a sunrise walk or a quiet village visit), you might find the lot closed or gated. If that lot is also the primary parking area for the town, it can get tricky. Just something to be aware of so you’re not caught off guard.
Outside cities, lots are usually ground-level or simple above-ground garages. You won’t often see the multi-level underground setups common in mainland Europe.
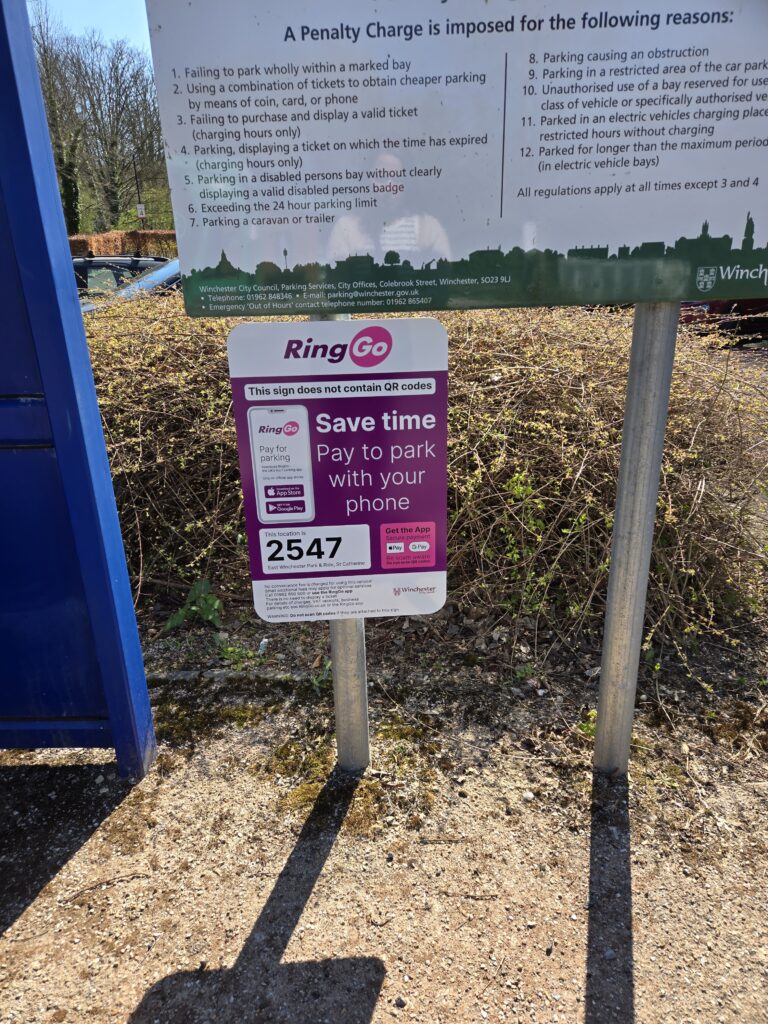
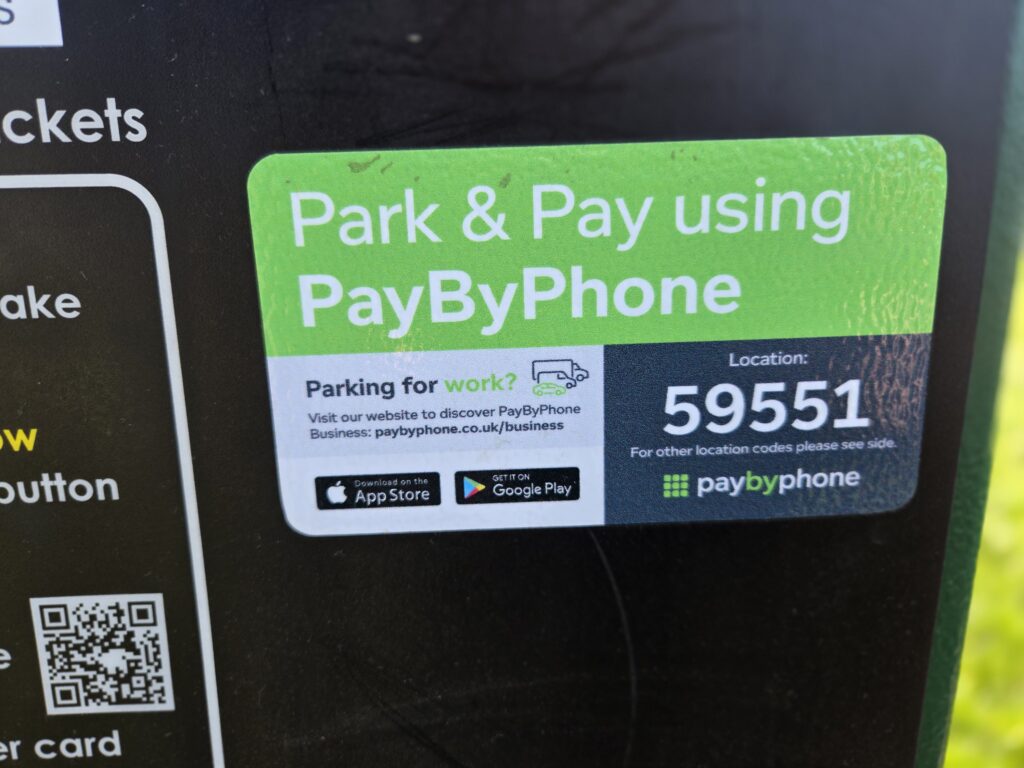
Photo above and below: Here are some signs that tell people how to pay using an App. You can download RingGo and PayByPhone in advance.
Consider Park & Ride Options
If you’re visiting a major city—especially one with traffic restrictions or limited parking—Park & Ride lots are your best friend. These are large parking lots located on the outskirts of town that offer frequent public transport into the center.
We used Park & Ride in Winchester and Oxford, and they were fantastic:
Affordable (in Oxford, our entire family’s transport + parking was half the price of taking the bus from other locations)
Easy to access
Designed with visitors in mind
Often have public toilets and picnic areas
Some are open for day use only, while others accommodate overnight parking—perfect for a multi-day stay in a city without the city-center stress.
How to Prepare for Congestion Charges (and Avoid Surprise Fines)
If you’re driving into a city—especially London, but also cities like Bath, Oxford, and Durham—you may enter a congestion charge zone, ultra-low emission zone (ULEZ), or other toll-based system. These are typically in place to reduce traffic and encourage the use of public transit.
And no, these aren’t optional. If you drive into one of these zones without paying, you may receive a hefty fine, even if you’re driving a rental.
Here’s what to know:
Research in advance. Google the city you’re visiting + “congestion charge” to check if it applies to you. London, for example, has multiple overlapping zones (Congestion Charge, ULEZ, and LEZ).
Plan your route around it. We avoided driving into central Oxford altogether by using the Park & Ride (much easier and cheaper).
Some cities require you to register your car in advance, even if you’re not paying a fee. If you’re driving a rental, this can be tricky because you may not know your license plate until pickup.
Check with your rental company. Some agencies register the vehicle for you (especially in London), but others do not—and will forward you any fines after the fact (plus an admin fee).
You may need to pay online. In places like London, you can pay the charge up to 3 days in advance, or by midnight the day of your trip.
💡 Bonus tip: If you’re staying outside a city, look for public transit connections or Park & Ride options. They’re often cheaper, faster, and congestion-zone-free.
Cities That May Charge for Driving (Congestion, Clean Air, or Emissions Zones)
| City | Type of Charge | Applies To | Notes |
|---|---|---|---|
| London | Congestion Charge, ULEZ, LEZ | Most vehicles | Multiple overlapping zones; check daily charges and times |
| Bath | Clean Air Zone (CAZ) | Taxis, vans, buses, some older cars | Private cars currently exempt, but that could change |
| Birmingham | Clean Air Zone (CAZ) | Older vehicles (pre-Euro 4/6) | Automatic number plate recognition used |
| Oxford | Zero Emission Zone (ZEZ) pilot | All petrol/diesel vehicles | Small city-center area; expanding in stages |
| Durham | Congestion Charge | All vehicles entering peninsula | Very small zone; designed for historic preservation |
| Bradford | Clean Air Zone (CAZ) | Commercial vehicles only | Private passenger cars are currently exempt |
| Portsmouth | Clean Air Zone (CAZ) | Buses, taxis, vans | Private cars currently exempt |
| Greater Manchester | CAZ (planned/delayed) | TBD | Rollout postponed; check for updates |
Check the local rules for the city you’re visiting—many have exemptions for certain vehicles, time windows, or resident permits. These rules can change, and more towns may add new restrictions in the future, so think of this list as a warning rather than a guarantee.
🛠️ You can check your vehicle here: gov.uk/clean-air-zones
Navigating ULEZ & Drop-Off Charges Around Heathrow (LHR)
If you’re picking up or dropping off a car at Heathrow Airport, be aware that the airport sits inside London’s expanded Ultra Low Emission Zone (ULEZ) as of August 2023. This means that depending on your vehicle (especially if it’s older or diesel), you may owe a daily charge—even if you only drive a short distance to or from the airport.
Even just passing through nearby areas like Hounslow or Ealing could trigger the charge, especially if your GPS reroutes you or you miss a turn. This zone is camera-enforced, and fines are mailed later if you don’t pay.
How to Handle ULEZ Charges:
Check your route in advance—use Waze or Transport for London’s site with ULEZ filters enabled.
Ask your rental company if the vehicle is registered or pre-paid for ULEZ (some are, especially those picked up at LHR).
You can pay the fee yourself at tfl.gov.uk if needed. You’ll need your license plate number.
If you’re not sure you entered the zone, check retroactively—it’s worth the peace of mind.
Heathrow Drop-Off Charge – What It Is & Whether You Owe It
Separate from the ULEZ, Heathrow has a £5 terminal drop-off charge that applies any time you drive right up to the terminal entrance—whether for pickup or drop-off. It must be paid online by midnight the same day, or you may receive a fine.
You only need to pay this if you:
✅ Dropped someone off directly at the terminal curb
✅ Picked someone up from the terminal entrance
✅ Didn’t pay online the day of
You Likely Don’t Owe the Drop-Off Charge If…
If you returned a rental car at a location like Avis/Budget near the Holiday Inn, you probably didn’t enter the charge zone. These off-site lots are outside the terminal loop, and shuttle passengers to and from the terminals—bypassing the fee altogether.
What You Can Do (for peace of mind):
Check your Google Maps timeline (if enabled) to see if your route passed through a terminal drop-off loop.
Look at your rental return receipt—if it shows a non-terminal address, you’re golden.
Still unsure? You can check your license plate at Heathrow’s drop-off payment checker just in case.
Navigating ULEZ & Drop-Off Charges Around Heathrow (LHR)
If you're picking up or dropping off a car at Heathrow Airport, be aware that the airport sits inside London’s expanded Ultra Low Emission Zone (ULEZ) as of August 2023. This means that depending on your vehicle (especially if it’s older or diesel), you may owe a daily charge—even if you only drive a short distance to or from the airport.
Even just passing through nearby areas like Hounslow or Ealing could trigger the charge, especially if your GPS reroutes you or you miss a turn. This zone is camera-enforced, and fines are mailed later if you don’t pay.
How to Handle ULEZ Charges:
- Check your route in advance—use Waze or Transport for London’s site with ULEZ filters enabled.
- Ask your rental company if the vehicle is registered or pre-paid for ULEZ (some are, especially those picked up at LHR).
- You can pay the fee yourself at tfl.gov.uk if needed. You’ll need your license plate number.
- If you’re not sure you entered the zone, check retroactively—it’s worth the peace of mind.
Heathrow Drop-Off Charge – What It Is & Whether You Owe It
Separate from the ULEZ, Heathrow has a £5 terminal drop-off charge that applies any time you drive right up to the terminal entrance—whether for pickup or drop-off. It must be paid online by midnight the same day, or you may receive a fine.
You only need to pay this if you:
- Dropped someone off directly at the terminal curb
- Picked someone up from the terminal entrance
- Didn’t pay online the day of
✅ You Likely Don’t Owe the Drop-Off Charge If...
If you returned a rental car at a location like Avis/Budget near the Holiday Inn, you probably didn’t enter the charge zone. These off-site lots are outside the terminal loop, and shuttle passengers to and from the terminals—bypassing the fee altogether.
What You Can Do (for peace of mind):
- Check your Google Maps timeline (if enabled) to see if your route passed through a terminal drop-off loop.
- Look at your rental return receipt—if it shows a non-terminal address, you're golden.
- Still unsure? You can check your license plate at Heathrow’s drop-off payment checker.
| Airport | ULEZ Applies? | Drop-Off Charge | Notes |
|---|---|---|---|
| Heathrow (LHR) | Yes | £5 | ULEZ & drop-off charge apply; camera enforced; pay online |
| Gatwick (LGW) | No (but routes may enter ULEZ) | £5 | Drop-off fee at terminals; check route for possible ULEZ areas |
| Stansted (STN) | No | £7 for 15 mins | Free drop-off shuttle from mid-stay lot available |
| Luton (LTN) | No | £5 for 10 mins | Mid-stay lot offers 1 hour free with shuttle to terminals |
| London City (LCY) | Yes | No | ULEZ applies; no separate drop-off charge |
🚗 Driving to Mainland Europe via the Channel Tunnel
If you're planning to drive from the UK to mainland Europe, taking your car through the Channel Tunnel with LeShuttle is a fast and convenient option. It’s the quickest way to reach France by car—just 35 minutes from Folkestone to Calais.
Key Details:
- Booking: Reserve your ticket in advance at leshuttle.com. Early bookings often get the best rates.
- Vehicle Eligibility: Most vehicles are allowed, but confirm with your rental company before booking—some restrict cross-border travel.
- Travel Experience: You’ll stay in your car during the crossing, but you can step out to stretch or use the on-board toilets.
- Ticket Types:
- Day Trip & Overnight: From £59 one-way, for returns within 2 days
- Short Stay Saver: For trips up to 5 days
- Standard: For longer stays
- Flexiplus: Fully flexible with priority boarding & lounge access
- Extras: No luggage limits, pet-friendly, eco-conscious option
Learn more and plan your journey: LeShuttle.com
🚢 Prefer a Ferry? Other Ways to Drive from the UK to Europe
While LeShuttle is the fastest, it’s not your only option. If you’d rather avoid a tunnel under the sea (understandable!), several ferry routes connect the UK and continental Europe—with scenic views and a bit more breathing room.
Popular Car Ferry Routes:
- Dover to Calais or Dunkirk – 90–120 min. Operated by DFDS & P&O Ferries
- Newhaven to Dieppe – ~4 hours, ideal for Normandy
- Portsmouth/Poole/Plymouth to France/Spain – overnight sailings with Brittany Ferries
🆚 LeShuttle vs. Ferry – Quick Comparison
| Feature | LeShuttle | Ferry |
|---|---|---|
| Duration | ~35 minutes | 90 mins – 8+ hours |
| Stay in Car? | Yes | No (you’ll go to a lounge) |
| Scenery | None (tunnel) | Sea views & fresh air |
| Booking Flexibility | Good with Flexiplus | Lots of sailing options |
| Eco-Friendly | ✔ Lower CO₂ | ✘ Higher CO₂ |
| Pet Friendly | Yes | Yes (pet zones) |
Final thought: If you're a bit uneasy about tunnels (hi, same), or if the weather is lovely and you’d enjoy the view, ferries offer a more relaxed and scenic crossing. Either way, it’s good to know your options when planning a drive between the UK and Europe!
Getting Gas or Charging Your EV in the UK
Getting fuel in the UK is a lot like in the US—maybe even easier in some ways. I never had trouble finding a petrol station, and the whole process felt familiar.
A Few Notes for Gas Drivers:
Fuel is priced in liters, not gallons..
You’ll choose between Unleaded and Diesel. Make sure you know which your rental uses—mistakes here are expensive.
At most stations, you either pre-auth at the pump or note your pump number and pay inside after fueling. Okay, it’s really the same as back home.
Total cost for reference: I paid £66 total for our full trip (LHR → Windsor → Winchester → Bath → Cotswolds → Warwick → Oxford → back to LHR), with some public transport mixed in.
Departure tip: Fill up the tank the night before your flight if returning to Heathrow—it saves time and potential stress the morning of.
Thinking About an EV?
I went with a petrol car this time, but I noticed EV stations in lots of places—even smaller towns. In hindsight, I might’ve been just fine with an EV.
That said, if you’re not already comfortable with EVs, your first time driving on the left in the UK might not be the moment to try both at once. Still, if you already drive an EV back home, renting one here could be a great choice—and often less expensive to rent.
🔌 Tips for Driving an EV in the UK:
Plan your route with charging stops in mind, especially in rural areas like the Cotswolds. Apps like Zap-Map or PlugShare are commonly used to find stations and check availability.
Not all vacation rentals have chargers, so you may need to top off before arriving at your lodging.
Many EV stations are fast chargers, especially at motorway service stops. These can often get you 80% charged in under 30 minutes.
Bring your own charging cable if your car requires one—ask the rental company in advance.
Some chargers require an app or UK-based contactless card—so always have a backup method in case one doesn’t work.
Taking Breaks from Driving Everywhere
While we did rent a car for our UK road trip, we definitely didn’t drive everywhere—and honestly, I think that made the whole trip more enjoyable and way less stressful.
For example, when we wanted to explore London from Windsor, I originally planned to drive to a Tube station and park nearby. But plans shifted—as they do—and instead we ended up hopping on a double-decker bus just a short walk from our apartment. It cost £3 per person, dropped us into central London, and from there, we connected to the Underground. It was easy, scenic, and way less stressful than driving into the city.
On the way back? We took the train back to Windsor—smooth and simple.
We did something similar in Oxford: we stayed on the outskirts, with free parking, and relied on public transportation to get into the city center. No city driving, no expensive parking, and no congestion charges. On the last day, when we needed to move our car, we used the nearby Car Park. And you know what? It was better that way. Less pressure, and honestly more fun.
Pro tip: Staying just outside major cities often means saving money free parking is included. And Park & Ride lots are built exactly for this kind of setup—they’re convenient, affordable, and make city visits way easier.
Also, it gave us a chance to experience some of the UK’s public transport—which, let’s be honest, is half the fun. We bumped into locals and overheard the wildest conversations – it may even inspire a future blog post. Riding a double-decker bus was on my daughter’s to-do list, and it did not disappoint. And if you’re headed into London, let me say this: the Tube is iconic. Even if it’s not glamorous, it’s a moment. Snap a photo under the red-and-blue Underground sign, listen for the “Mind the Gap,” and take it all in.
And yep—that’s how I met Bramley the fox, too. You can read that story here.
So yes, rent the car. But don’t feel like you have to drive it everywhere. Sometimes the best move is to park it—and enjoy the ride.

Photo above: The kids didn’t mind the bus at all. Seats even had wireless charging stations on the back of headrests.

Photo above: And on the tube – well, we fit right in with the locals.
Yes, There Are Drive-Thrus (And They Work Like You’d Expect)
In case you’re wondering—yes, the UK has drive-thrus. You’ll spot familiar brands like Starbucks, McDonald’s, and Costa at motorway rest stops and even in town centers. And honestly? They work almost exactly like they do in the US.
We stopped at a Starbucks mid-trip, and—on our final night, when convenience won—we hit a McDonald’s near our apartment outside Heathrow. It was simple, fast, and oddly comforting for our kids after 10 days of navigating unfamiliar roads.
The only real difference? Since the driver’s seat is on the right, you’ll be interacting with the window and ordering from that side. Not a big deal, but something to mentally prepare for. Also, parking lot layouts can be a little confusing, so pay attention to arrows directing traffic through the queue.
Otherwise, it felt just like home: quick stop, hot coffee, and back on the road.
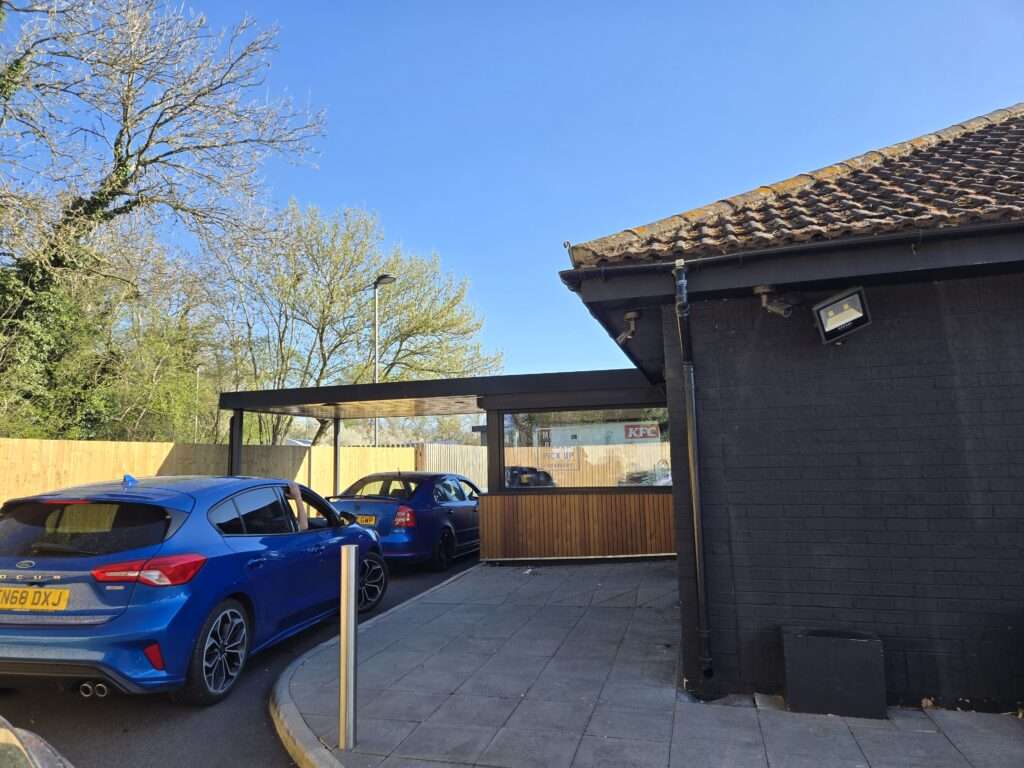
Photo above: We are in line for Starbucks along the motorway. There was also a KFC at this stop.
Driving in the UK Gives You Access to Marvelous Views and Scenery
I didn’t set out to write such a long post—but once I got started, I realized just how much there is to know, and how many little things I wish someone had told me ahead of time. So if you’ve made it this far: thank you—and also, don’t let the length intimidate you.
I was pretty nervous myself before setting out. I had read so much, and there were so many things to consider. But in reality? It all worked out. Driving in the UK wasn’t nearly as hard as I made it in my head. So don’t let fear or uncertainty stop you from doing it.
Because honestly—some of the best moments of our trip happened because we had a car. We had the flexibility to see places at our own pace, stop where we wanted, and wander into areas we wouldn’t have reached otherwise. Sure, some were tourist spots. But others were just… glimpses of real life. Of how people actually live. And that felt special.
The English countryside is stunning. The people are warm and welcoming. There is so much more to see beyond London and the usual highlights. This kind of trip opened up spaces in my mind I didn’t know were there. It can do the same for you.
And hey—if something goes wrong? It’s part of the story. You’ve got rental insurance. And more importantly, you’ll probably be more alert and cautious than you ever are driving at home. That nervous energy? It might actually make you safer.
So go. Drive. Wander. See the things.


Readjusting to the Right-Side
Okay—so while the last section technically wrapped everything up, you might still find yourself wondering (like I did): What happens when I go back to driving on the right-hand side?
I wasn’t sure. By the end of our trip, I was honestly starting to feel like a left-side driving pro. I had gotten the hang of it, and my confidence was up. So I wondered: Would my old brain remember how to flip back?
Here’s how it went.
On our final day in the UK, I drove us to Heathrow like a champ—left-side and all. Then we boarded a 9-hour flight, landed back home-ish, and picked up my ol’ trusty car from long-term parking. I was just happy it started up—driving a slightly older car helps fund the travel life. I drove us another five hours home… on the right-hand side.
And honestly? It felt completely natural. Like I had never left. No real readjustment needed.
Maybe if I had been in the UK for longer, it would’ve taken more time. But after just 10 days? Switching back was instant.
That said—the one thing that did feel off (and still does a little, even a week later) is this: not having the open space on the left side. My brain had grown used to that calm, clear visual margin. Now, back in my car, there’s just… a door. A mirror. A frame. It’s like there’s this bar in my left-side vision, and it bugs me.
Weird, right?
Here’s my theory: when you drive on the left, that space on your left side becomes a kind of visual comfort zone—quiet, wide, and unmoving. Your brain adjusts. It relaxes. And now that I’m back in my usual seat on the right side, that old comfort zone is gone. It just feels… off.
But honestly, that’s one of the best parts about travel. You notice things you never even thought to wonder about before. Things you didn’t know you could know.
So yes—your experience might vary. But if you’re nervous about re-learning the right side when you get home? Don’t be. It’ll likely come back faster than you think.
Good luck on your adventure. You’ve got this. And who knows? You might even come home seeing the road a little differently.